猫狗识别经典案例:Serverless助力模型“升级”
目录
1 背景介绍
众所周知,在人工智能领域,一些训练好的模型可能会随着时间的发展,数据集的完善也会需要进行升级。例如某公司的人脸识别系统,可能会因为新员工的入职,老员工的离职要进行模型的升级迭代;再或者某分类模型可能在上线之初由于训练集的不完善,导致识别率并不高,但是在实际使用过程中不断的有用户进行问题反馈,进而不断的对模型进行完善,提升模型最终的准确率。
本文将会通过Kaggle平台非常著名的项目“Dogs vs. Cats“作为案例,通过在本地进行模型训练,并将预测模型部署到Serverless架构,通过用户反馈进行模型的升级和完善:

如上图所示,整个流程基本为在本地,开发者进行猫狗识别的建模与模型训练,完成之后将预测功能、用户反馈功能以及训练功能部署到线上;
- 预测功能:预测功能就是通过用户上传的图片,根据当前模型进行二分类的判断,确定图片是猫还是狗;
- 训练功能:所谓训练功能,就是通过建模对模型进行训练,但是在线上的训练过程是有一定的特殊性,此时会加载目前的模型,并在当前模型的训练基础上进行模型的训练和完善;
- 用户模型反馈功能:用户可以针对模型的预测结果,告知系统这个预测是否正确,例如用户上传了一只狗的照片,系统预测成为了猫,那么此时用户可以做一个反馈这是狗,此时该功能会将图片与用户的反馈记录到系统中,参与下次训练;
2 猫狗识别项目训练
Kaggle是由联合创始人、首席执行官安东尼·高德布卢姆(Anthony Goldbloom)2010年在墨尔本创立的,主要为开发商和数据科学家提供举办机器学习竞赛、托管数据库、编写和分享代码的平台。

在8年前,Kaggle平台上线了一个名为“Dogs vs. Cats“的比赛项目,时至今日,该项目已经成为了人工智能学习过程中非常经典的案例之一,该项目使用的猫狗分类图像一共25000张,猫狗分别有12500张:
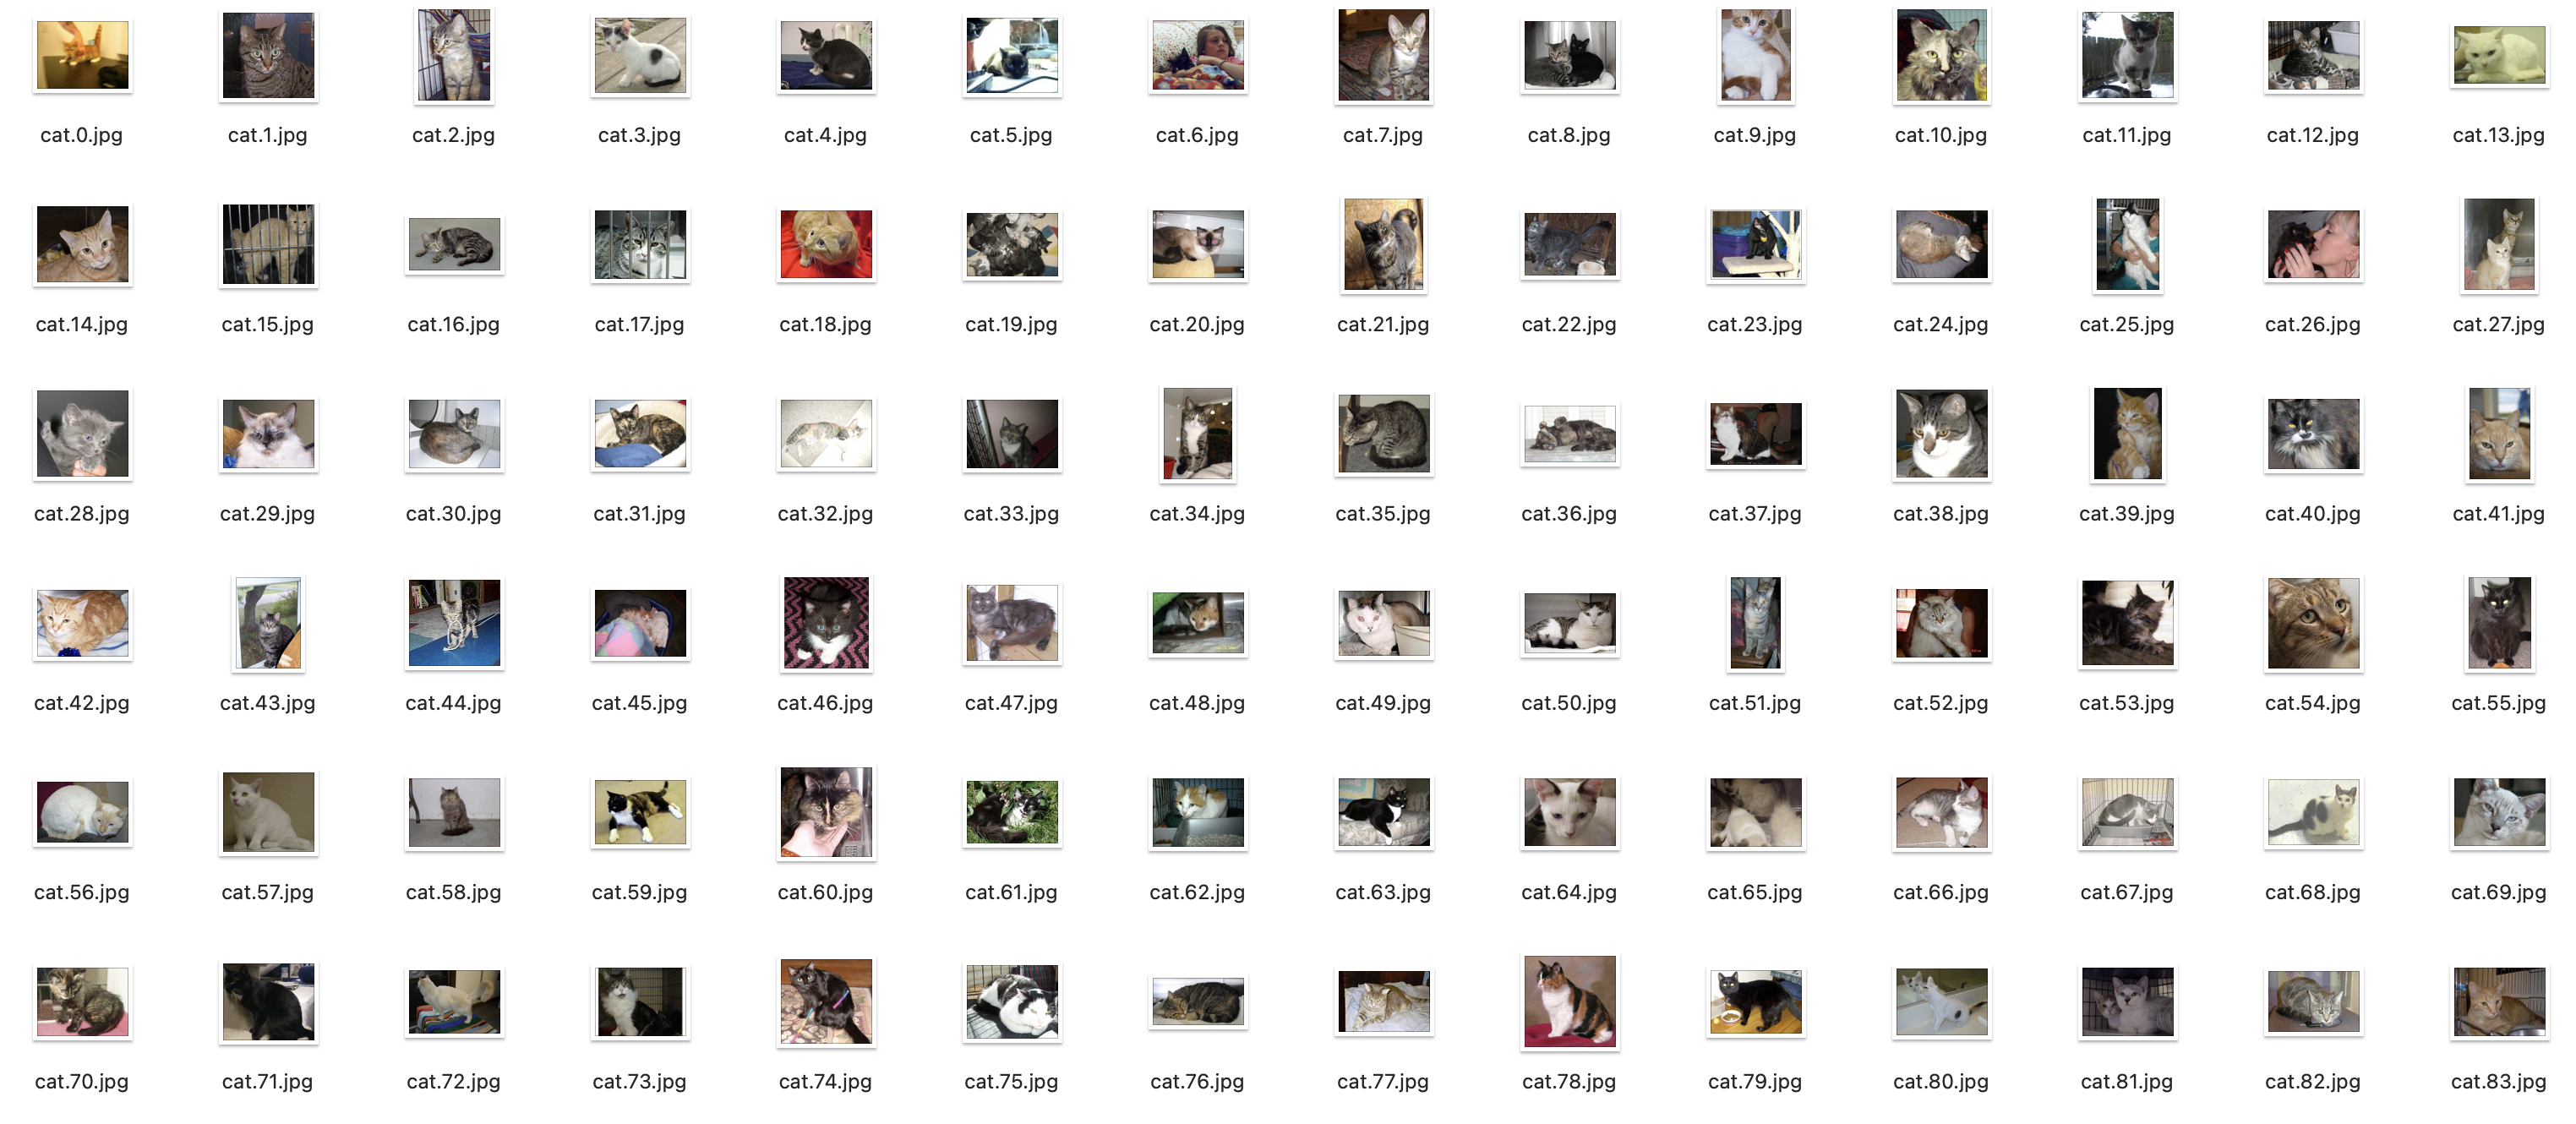
如上图所示,可以发现猫狗的姿态不一,有的站着,有的眯着眼睛,有的甚至和其他可识别物体比如桶、人混在一起,同时,图片尺寸也不一致,有的是竖放的长方形,有的是横放的长方形,所以这在一定程度上来讲,数据的预处理变得非常重要。
2.1 数据预处理
原数据的命名规则是类别.编号.格式,例如cat.73.jpg,为了便于数据的后期处理,此时可以讲猫与狗的图片进行归类:
1 | import os |
由于猫和狗的图片数据均为12500份,我们不仅要通过这些数据进行初始模型的训练,还要模拟测试后期通过函数计算进行模型更新完善的流程,所以此时在进行数据归类时,只把id小于5000的用于训练,大于5000的用于后期的模型完善:

完成上述的简单归类之后,为了有效使用内存资源,使用tfrecord来对图片进行存储:
1 | _float_feature = lambda value: tf.train.Feature(float_list=tf.train.FloatList(value=[value] if not isinstance(value, list) else value)) |
2.2 模型的构建
构建网络,可以使用tf.layer进行构建,例如创建一个简单的CNN网络:
1 | def model(inputs, mode): |
对该网络进行操作,包括创建网络、创建Loss对象、获取训练精度、可视化训练精度等:
1 | tf.summary.image('images', features) |
2.3 模型的训练
模型训练时,需要给定退出条件,在该模型中的推出条件是模型在之后连续5次训练没有准确率的提升,则认为该模型已经达到最优,当然在生产过程中,不同情况可能需要不同的模型训练推出条件,例如除了本次试验的退出条件之后,常见的退出条件还有:
- 模型一共训练指定的次数;
- 模型训练的准确度超过某预期数据等;
1 | # 创建状态 |
通过训练,可以看到结果:
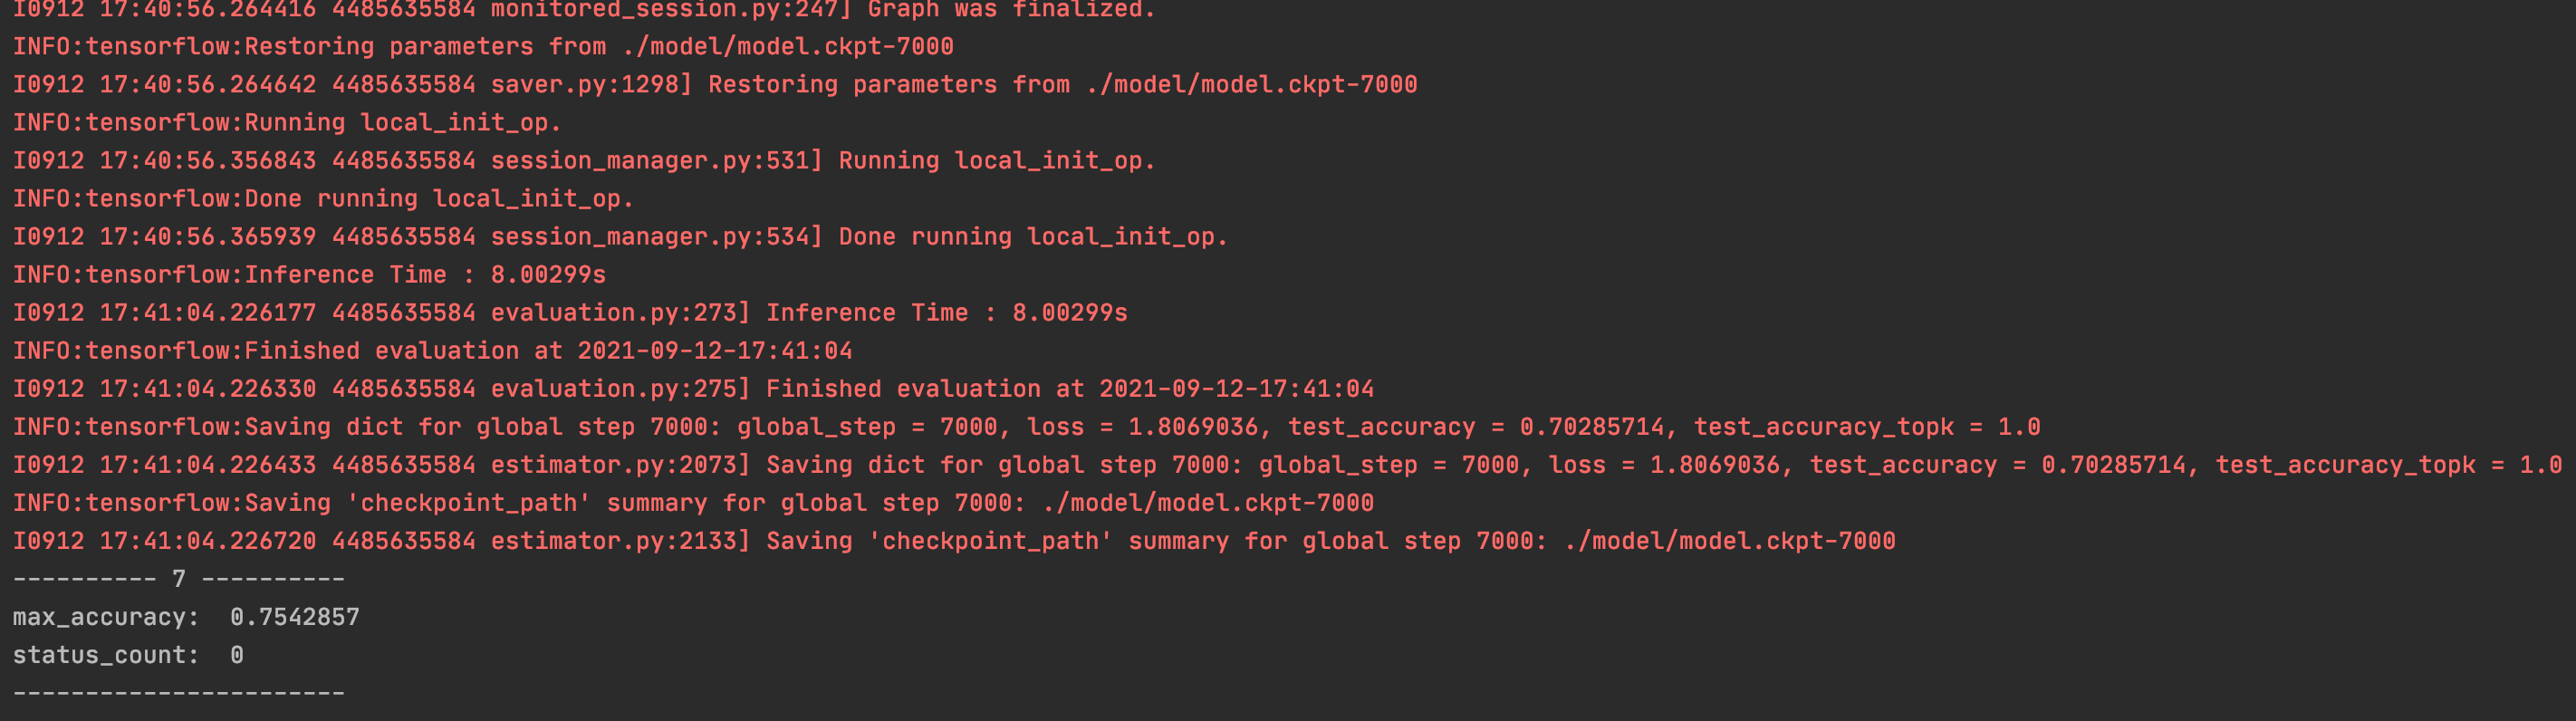
通过上图可以看到,模型在被训练了7轮时,模型停止,即在第2轮时,准确度达到了一个短期内的最优值。
2.4 训练可视化
通过Tensorboard可以看到在训练过程中的一些图像等信息:

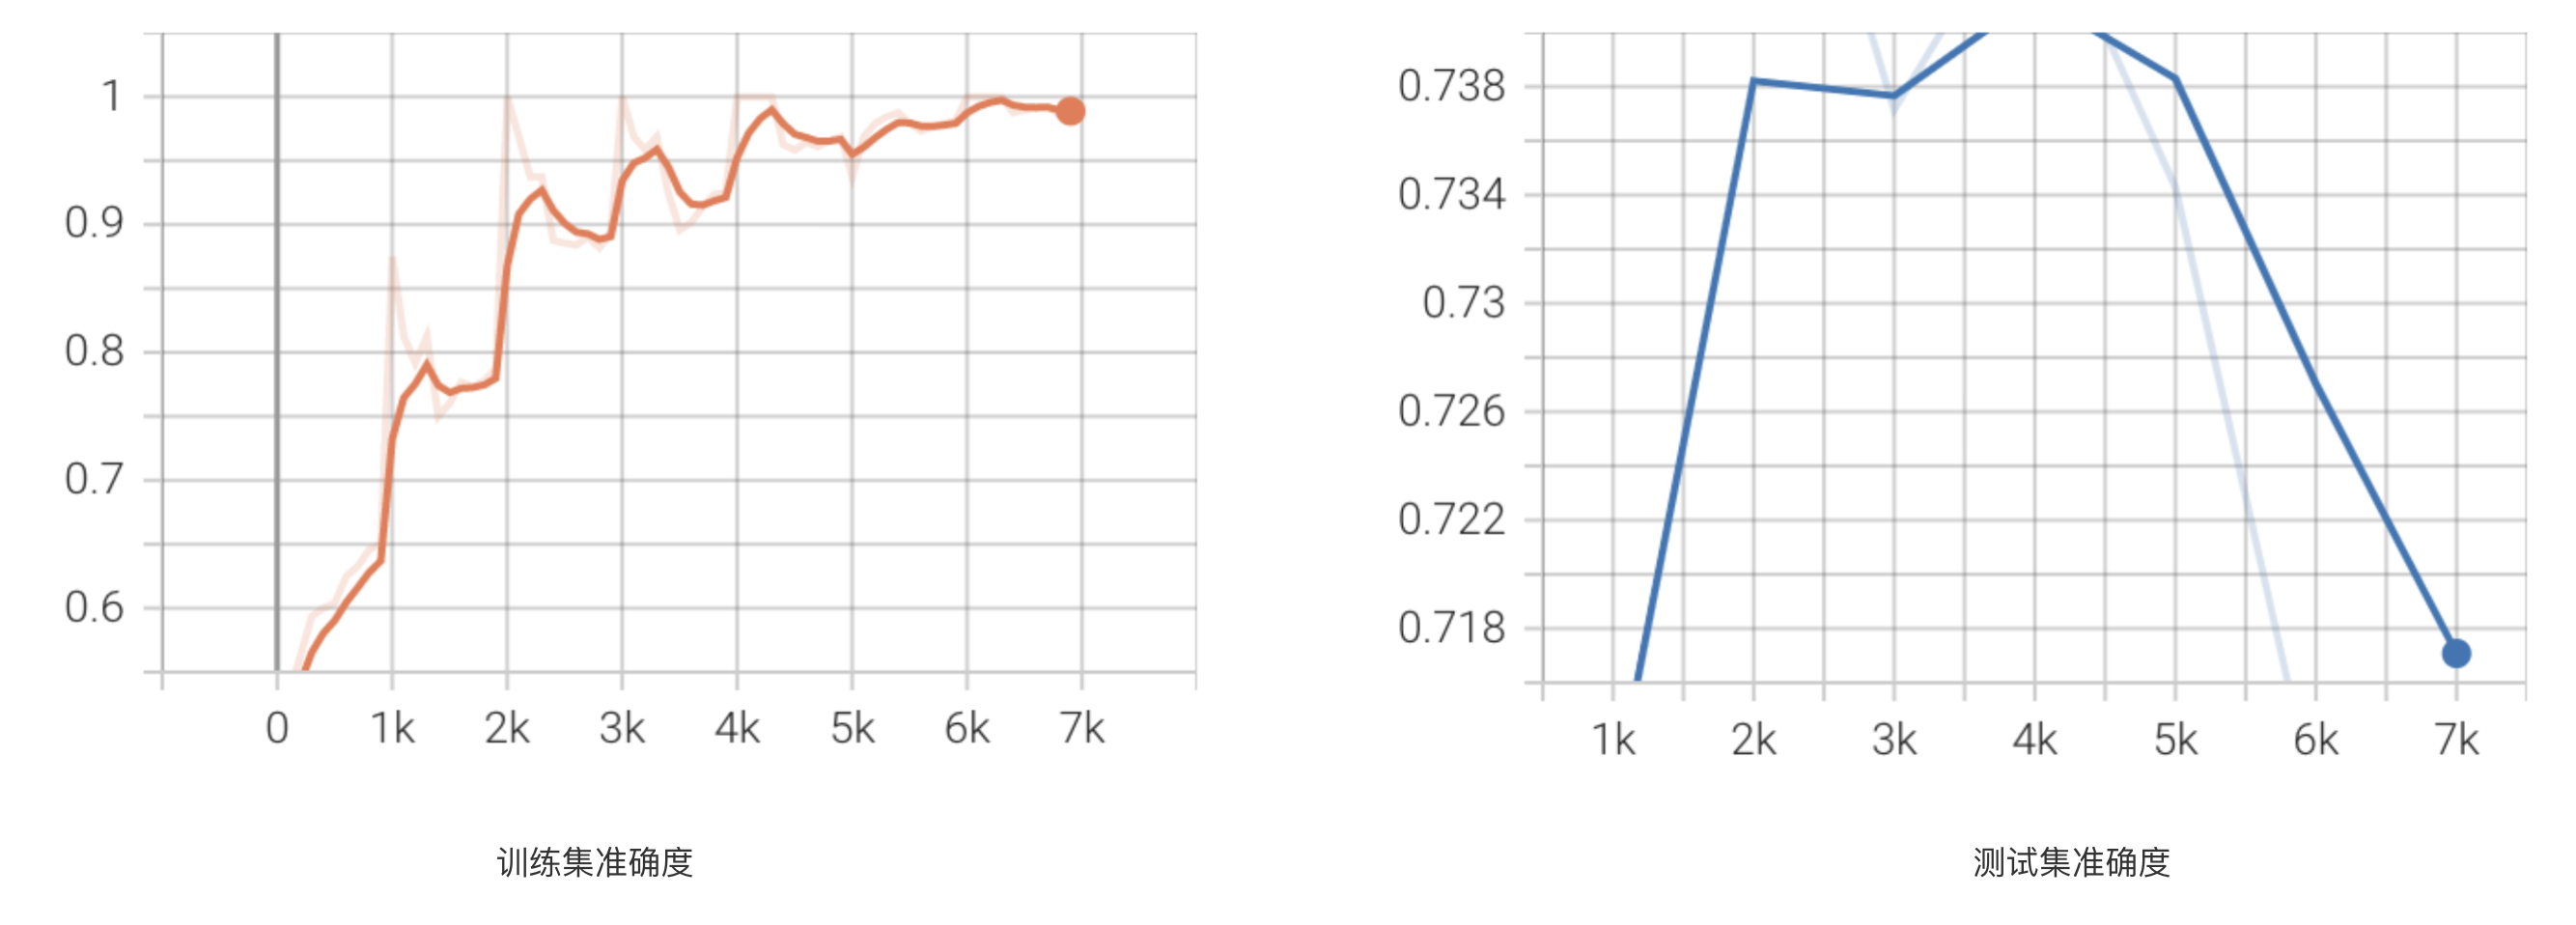
同时也可以看到Loss值,准确度等一些数据的可视化变化图(折线图),例如准确率变化:
整个模型的网络图:

2.5 模型的测试
通过predict()方法进行预测功能的编写:
1 | from __future__ import absolute_import |
完成之后,可以随机选择一张图片进行预测:

可以看到得到的结果是:{'dog': 0.69301635, 'cat': 0.3069837},即该图有极大的概率是狗。
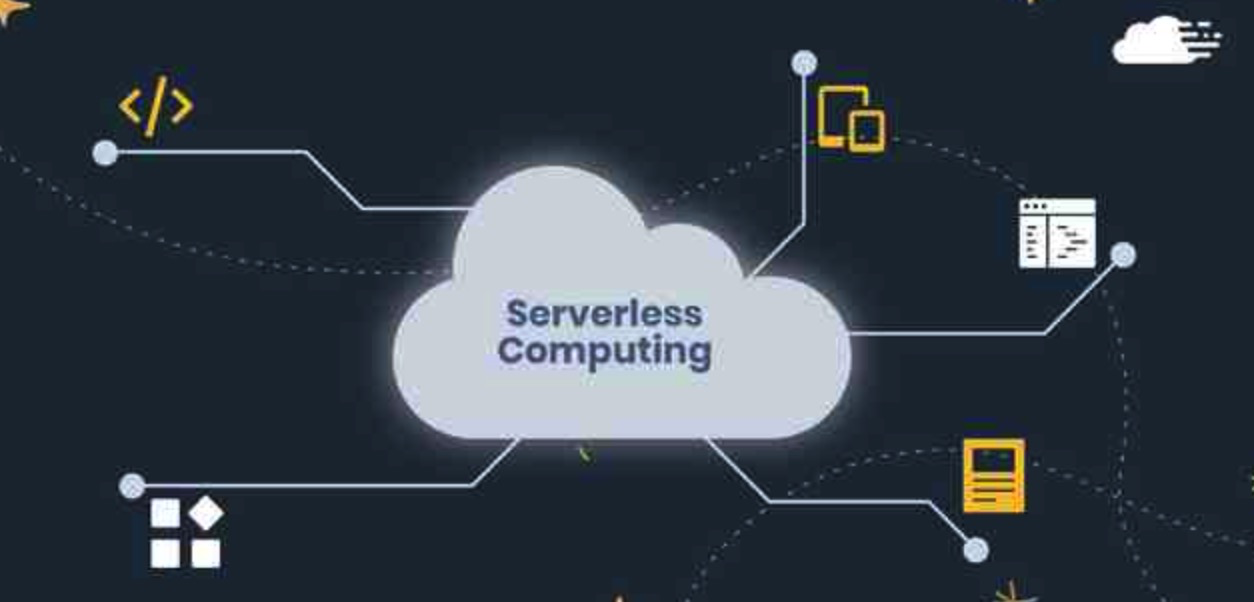
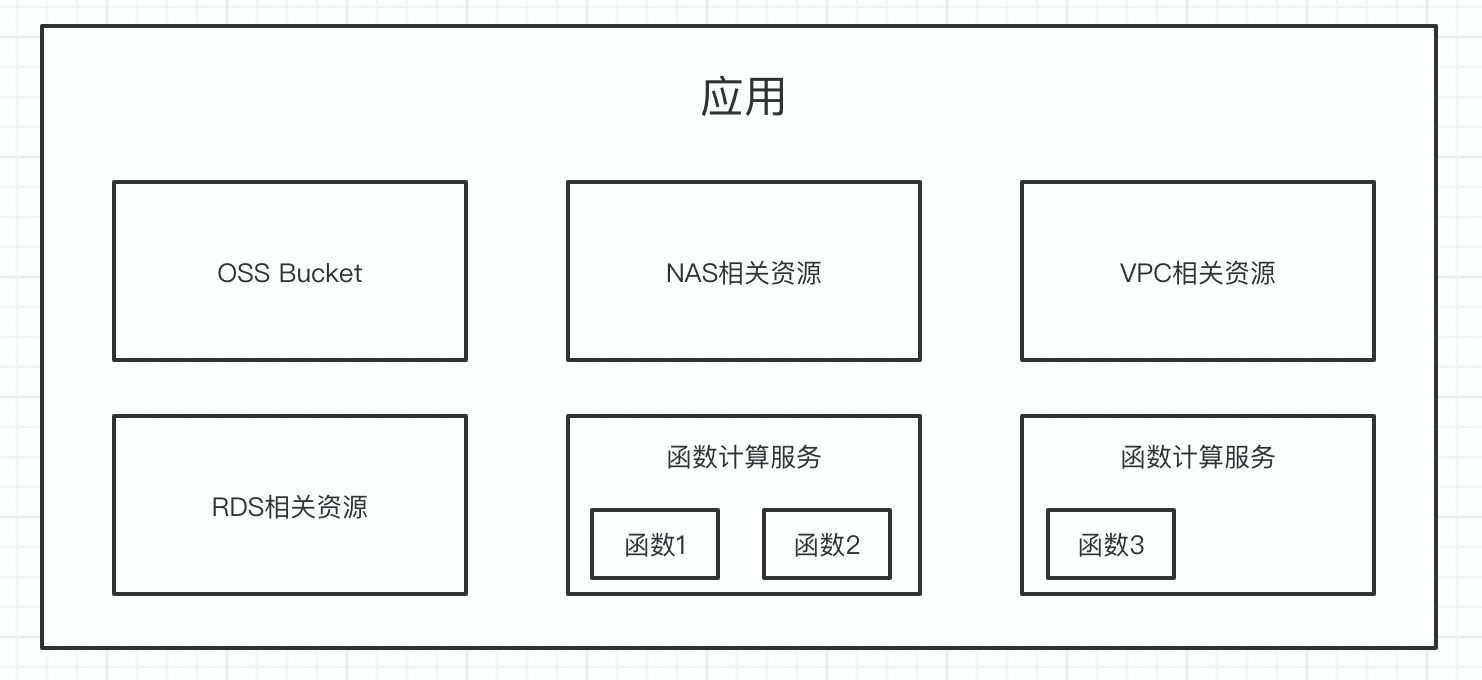
3 将模型部署到Serverless架构
将模型部署到线上会涉及到几个部分:
- 训练函数:该函数主要用于因模型迭代而所必需的训练行为,该函数将会采用对象存储触发器进行触发;
- 预测函数:该函数主要用于针对用户上传的图片进行预测行为,将会采用HTTP触发器进行触发;
- 用户反馈函数:这一部分主要是用户反馈的数据上传到对象存储,核心功能是数据持久化,相对来说这部分并不需要过多的计算资源,为了保证项目的整体成本,所以将这一部分拆出。
由于训练函数和预测函数需要Tensorflow等较为多,且较为复杂的依赖,所以此处为了简化流程,可以采用镜像部署方法,将应用构建成镜像并部署到Serverless架构上。另外这两部分可能涉及到比较多的计算资源,所以将会采用性能实例/GPU实例(现在阶段,在Serverless架构中,GPU实例并没有得到普及,所以在某些情况下也可以采用CPU版本的Tensorflow等)。
另外,由于该项目存在着魔性的更新迭代,而函数本身是不能进行“自更新”,所以此时更新迭代后的模型文件等就需要有额外的存储模块进行存储。所以此时可以考虑:

即通过额外的硬盘挂载
3.1 传统项目改造
3.1.1 预测函数改造
由于训练函数和预测函数是通过容器镜像部署,所以在一定程度上并不需要太多的改造,只需要将原有的执行方法与一些Web框架进行结合即可。以预测方法为例,可以与Bottle框架进行结合:
1 |
|
此时在本地测试由于没有设置release环境变量,所以将会执行:
1 | image_files = base.TEST_PIC |
如果在Serverless架构下执行,可以增加环境变量:
1 | release: true |
此时执行时就会对应:
1 | bottle.run(host='0.0.0.0', port=8080) |
3.1.2 训练函数改造
与此同时还需要对train.py等进行同样的改造,尽管train函数将会通过对象存储触发器进行触发,但是根据阿里云函数计算的文档可以看到:
对于Custom Container Runtime,您可以根据Headers中的x-fc-control-path来判断HTTP函数调用和事件函数调用。
- /invoke:该请求为事件函数调用。/invoke表示是Invoke函数调用请求。
- /http-invoke:该请求为HTTP函数调用。/http-invoke表示是一个HTTP Invoke函数调用请求。函数计算会将您的请求(包括Method、Path、Body、Query及Headers)加上Common Headers后转发给Custom Container Runtime,Custom Container Runtime返回的响应头和响应体则会被返回给客户端。
所以,此时也可以与Bottle框架进行结合:
1 | # 函数计算事件触发 |
3.1.3 预测函数改造
除此之外还需要实现用户反馈的函数代码:
1 | import bottle |
3.2 部署到Serverless架构
当完成项目的基本改造之后,可以进行相关配置资源的编写:
Dockerfile的编辑:1
2
3
4
5
6
7
8
9FROM python:3.7-slim
WORKDIR /usr/src/app
COPY ./model_fc/base.py .
COPY ./model_fc/prediction.py .
COPY ./model_fc/train.py .
RUN pip install tensorflow bottle numpy oss2 scikit-image tqdm -i https://pypi.tuna.tsinghua.edu.cn/simple/s.yaml资源描述文档的配置包括两个主要两个部分:全局变量的配置:
1
2
3
4
5
6
7
8
9
10
11
12
13
14
15
16
17
18
19
20
21
22
23
24vars:
region: cn-shanghai
service:
name: cats-vs-dogs-project
description: cats vs dogs project
nas: auto
vpc: auto
log: auto
image: 'registry.cn-shanghai.aliyuncs.com/custom-container/cats-vs-dogs:0.0.1'
httpTriggers:
- name: httpTrigger
type: http
config:
authType: anonymous
methods:
- GET
- POST
customDomains:
- domainName: auto
protocol: HTTP
routeConfigs:
- path: /*
environmentVariables:
release: true函数详情的配置:
1
2
3
4
5
6
7
8
9
10
11
12
13
14
15
16
17
18
19
20
21
22
23
24
25
26
27
28
29
30
31
32
33
34
35
36
37
38
39
40
41
42
43
44
45
46
47
48
49
50
51
52
53
54
55
56
57
58
59
60train:
component: fc
props:
region: ${vars.region}
service: ${vars.service}
function:
name: tarin
runtime: custom-container
memorySize: 32768
caPort: 8080
timeout: 7200
instanceType: c1
customContainerConfig:
image: ${vars.image}
command: '["python"]'
args: '["train.py"]'
environmentVariables: {vars.environmentVariables}
triggers:
- name: ossTrigger
type: oss
config:
bucketName: serverless-cats-vs-dogs
events:
- oss:ObjectCreated:*
filter:
Key:
Prefix: 'callback'
predict:
component: fc
props:
region: ${vars.region}
service: ${vars.service}
function:
name: predict
runtime: custom-container
memorySize: 2048
caPort: 8080
timeout: 60
customContainerConfig:
image: ${vars.image}
command: '["python"]'
args: '["prediction.py"]'
environmentVariables: {vars.environmentVariables}
triggers: {vars.httpTriggers}
customDomains: {vars.customDomains}
callback:
component: fc
props:
region: ${vars.region}
service: ${vars.service}
function:
name: callback
runtime: python3
memorySize: 256
codeUri: ./callback_fc
timeout: 60
handler: callback.app
environmentVariables: {vars.environmentVariables}
triggers: {vars.httpTriggers}
customDomains: {vars.customDomains}
完成相关配置的描述之后,可以通过Serverless Devs开发者工具,进行构建以及部署。
通过
build方法进行构建,例如构建train函数可以是s train build --use-docker: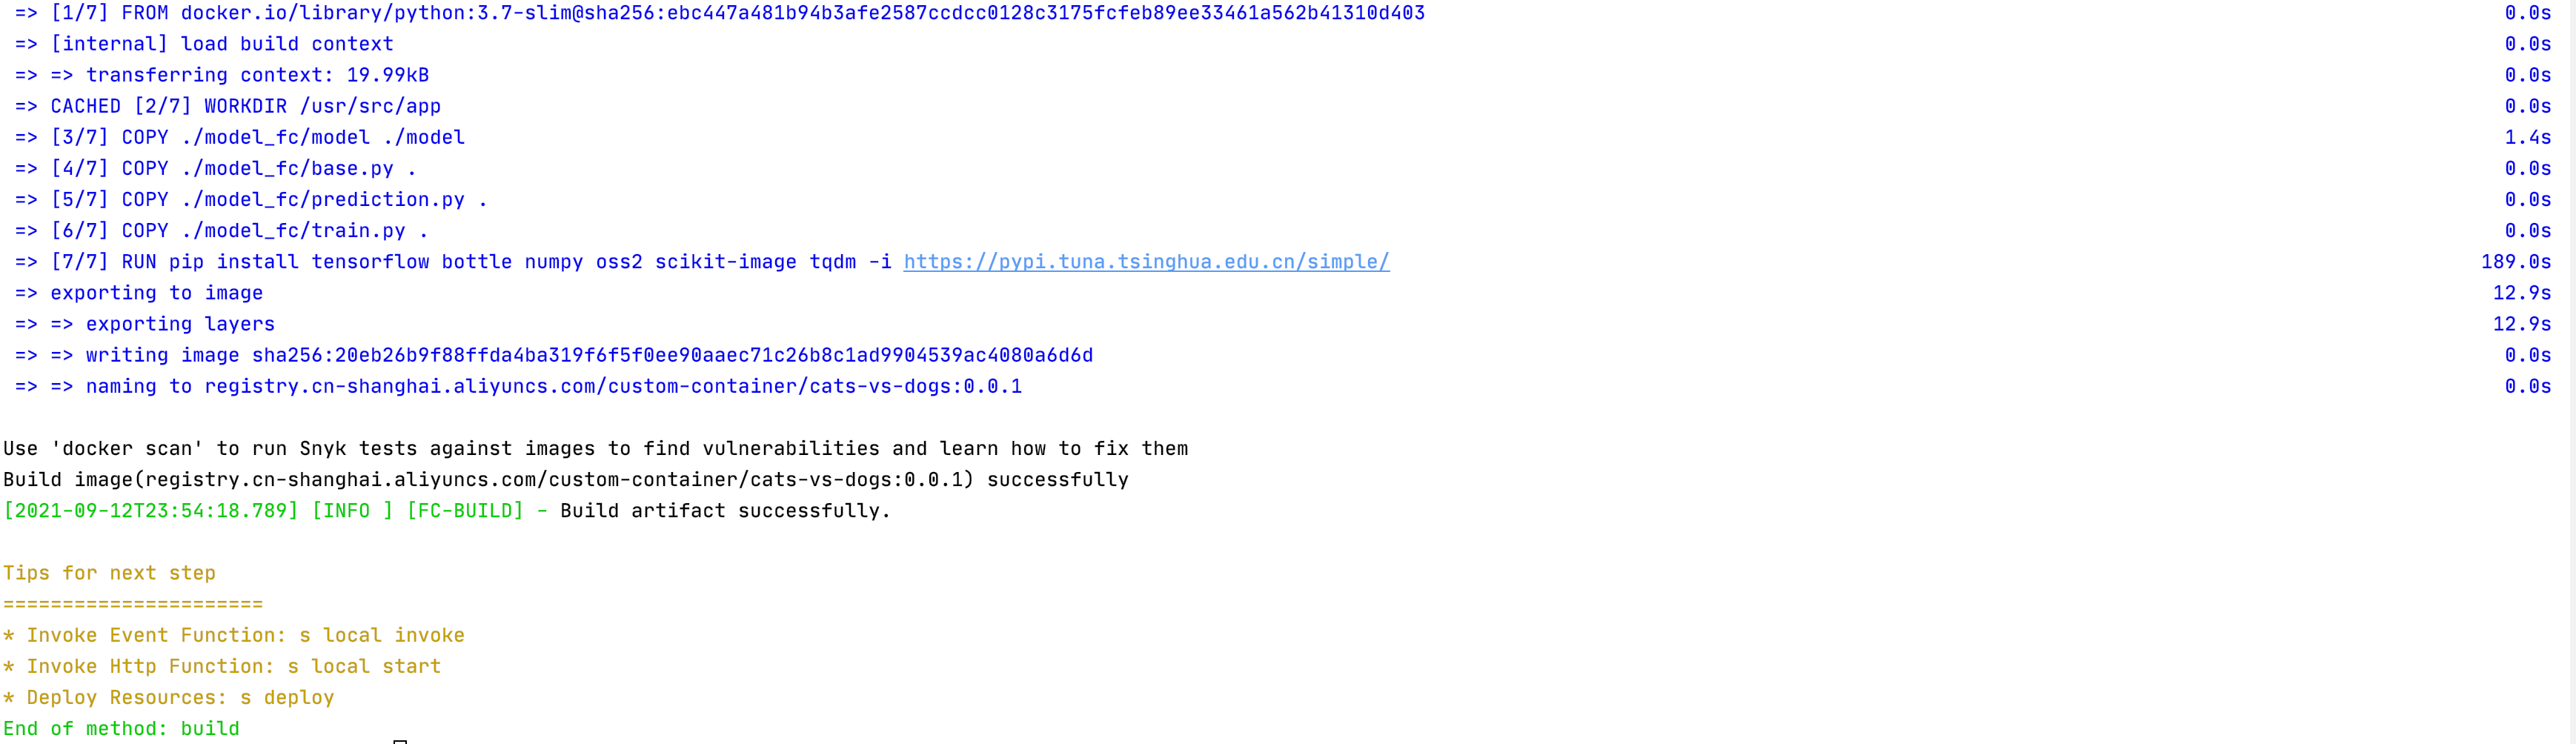
构建完成之后,可以通过
deploy方法进行部署,例如通过s train deploy可以部署train函数,通过s deploy可以同时部署所需要的三个函数:
部署完成之后,可以将模型文件上传到NAS中,以便加载和使用,例如:
1
s nas upload -r -n ./fc_model/model /mnt/auto/model
3.3 项目测试
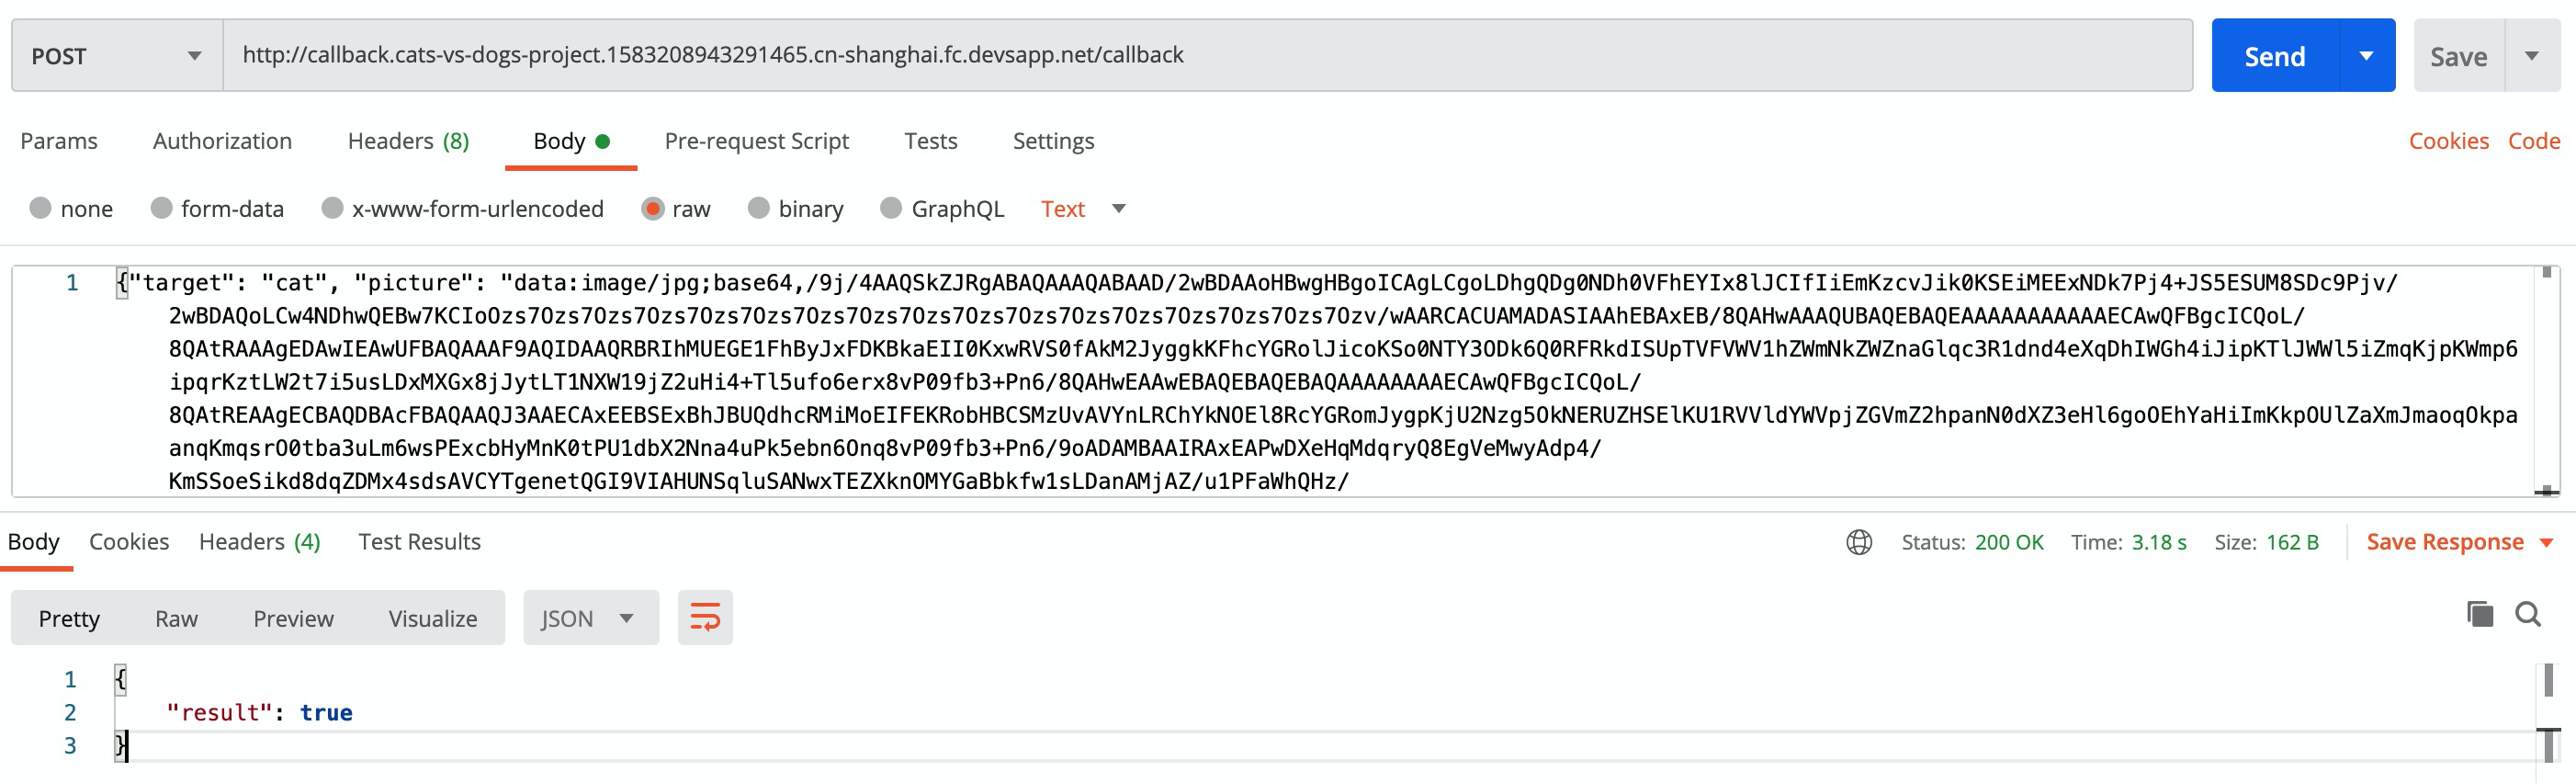
以predict函数为例,进行预测,此时可以选择一张图片,并转换为Base64编码:

通过系统返回的地址,以及Postman工具,进行测试:
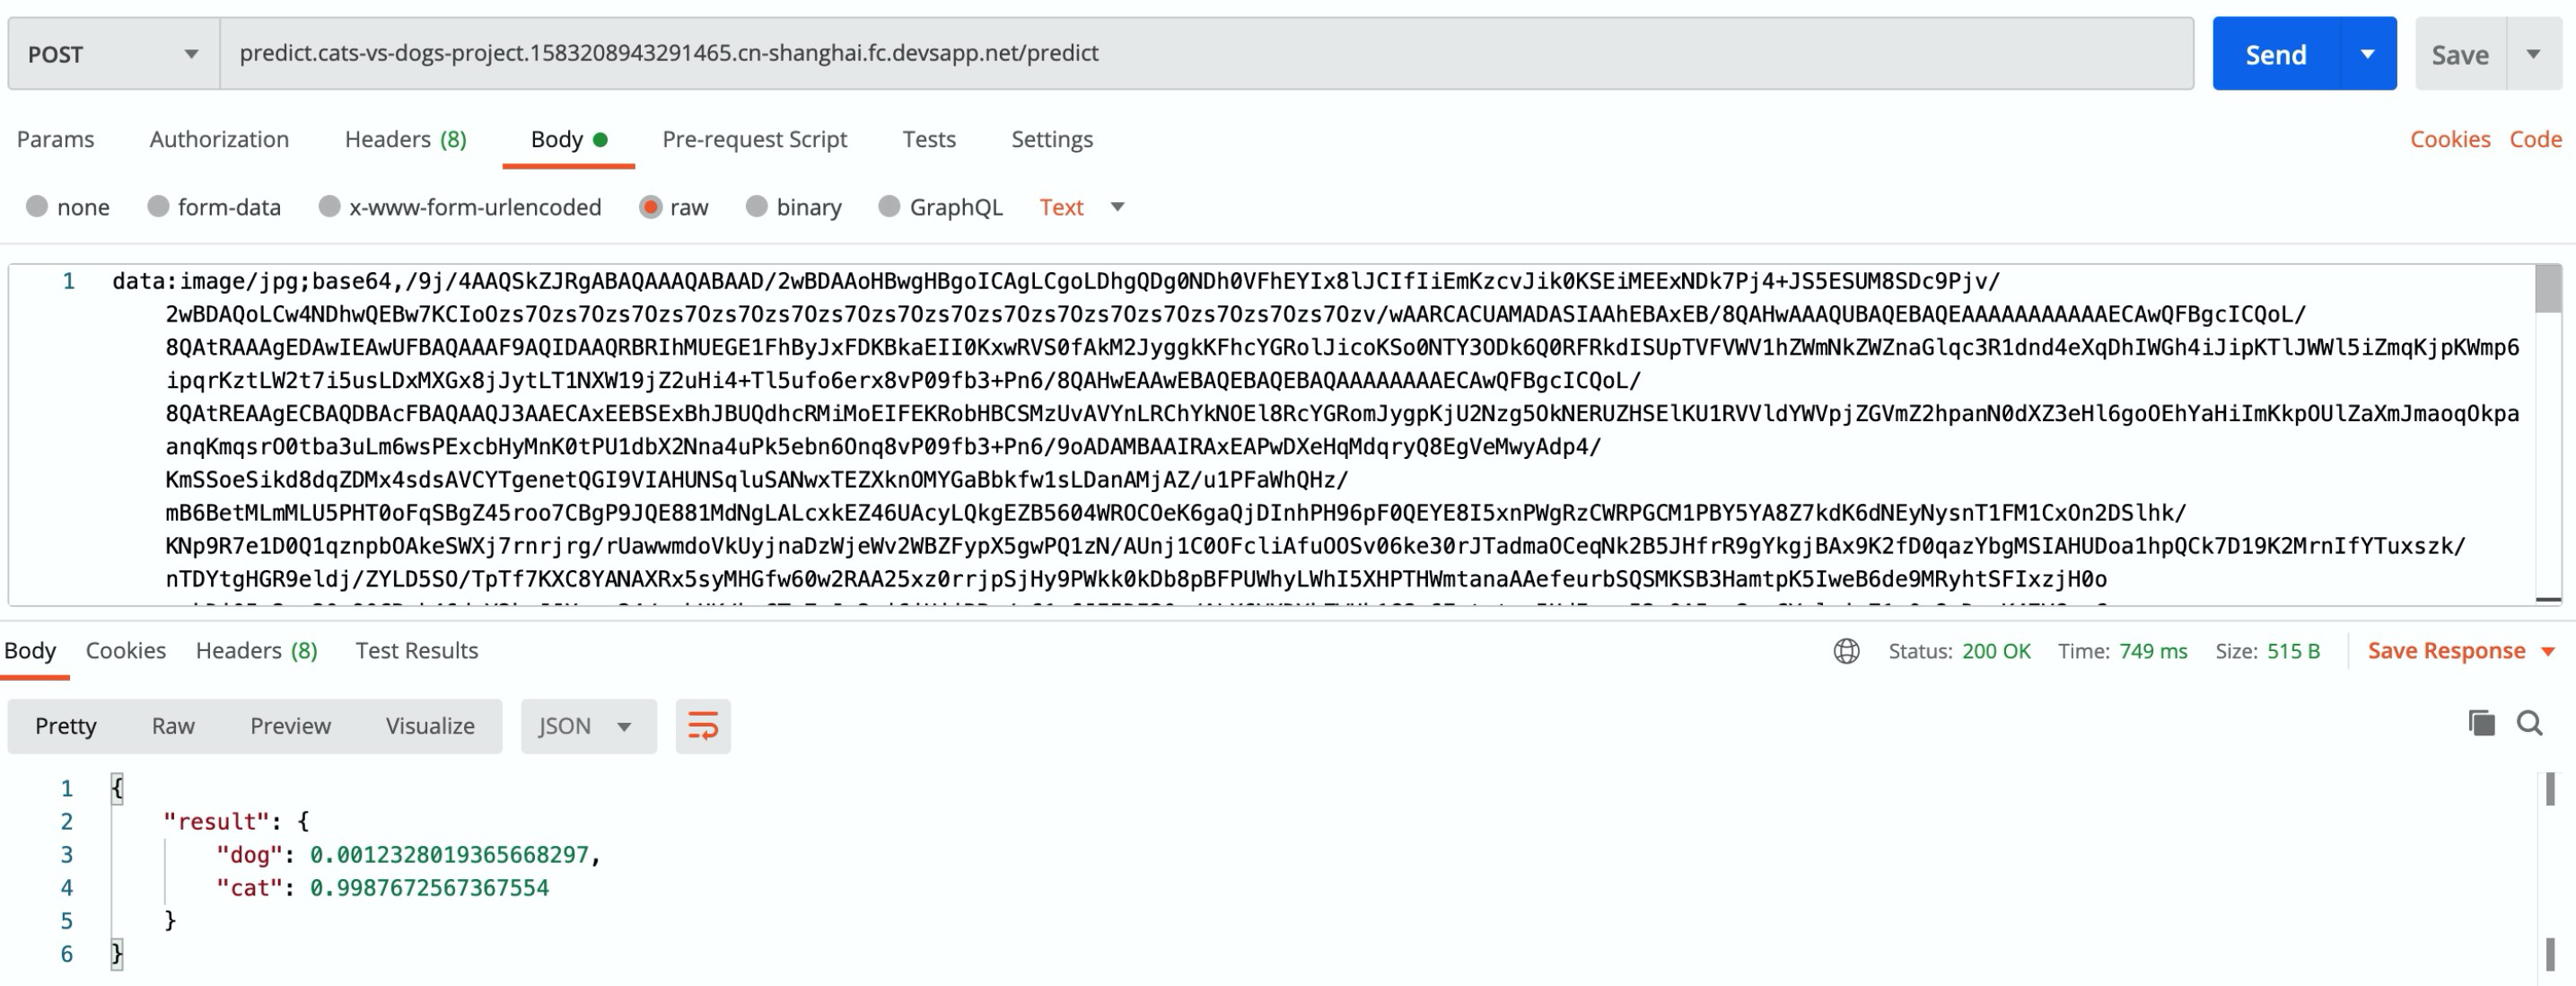
可以看到系统最终返回的结果是:
1 | { |
系统判定该图片为猫,符合预期标准。
4 用户反馈与模型迭代
用户反馈与模型迭代的核心流程如下:
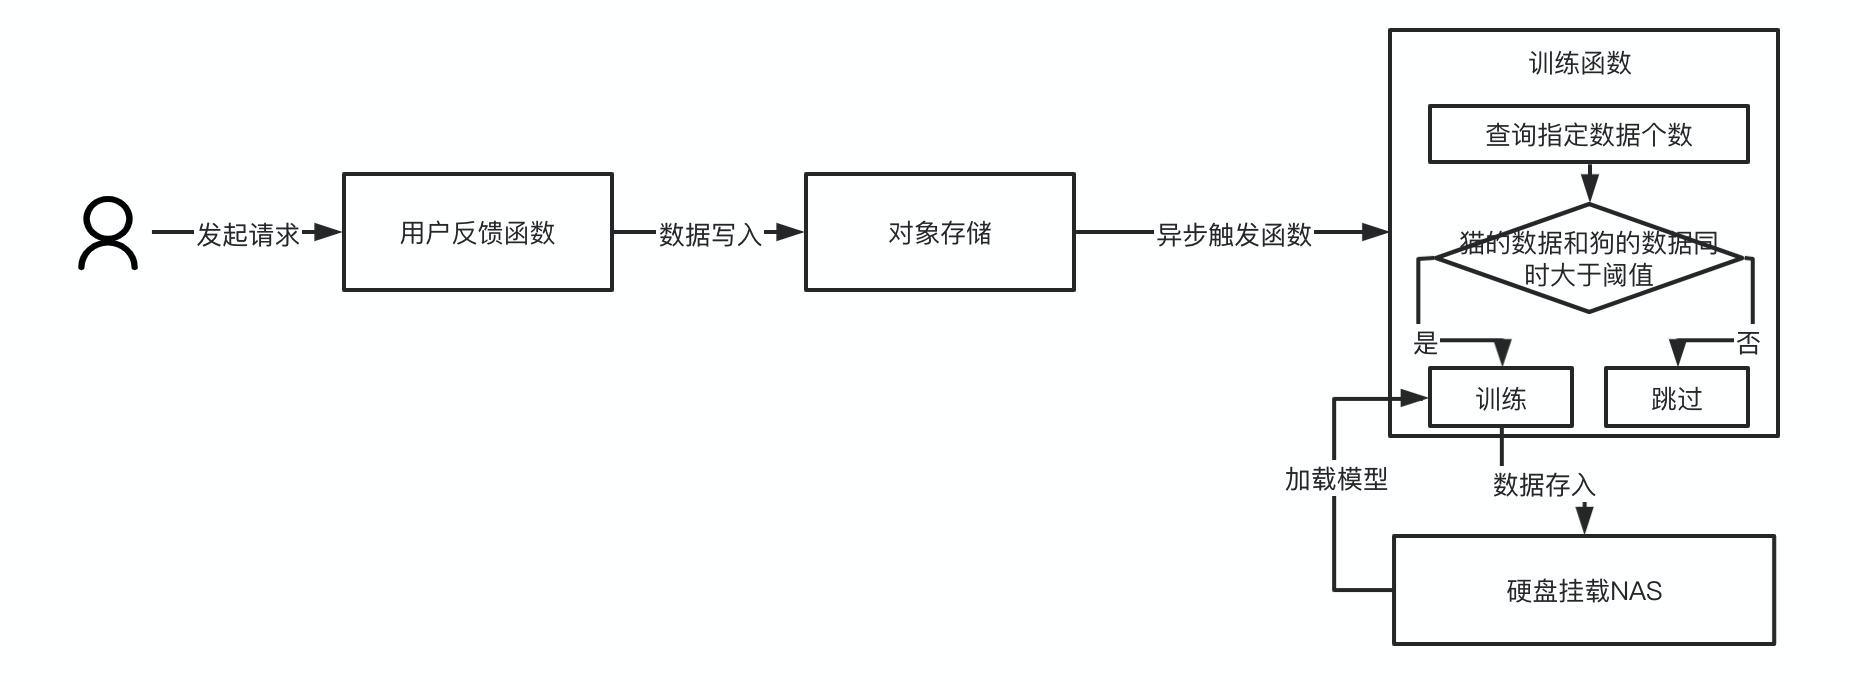
即当用户上传图片进行预测之后,发现预测结果可能并不是自己想要的,或者用户有一批新的标注内容上传到系统,此时可以触发用户反馈函数,将上传的图片和标注的内容发送给函数:
1 | { |
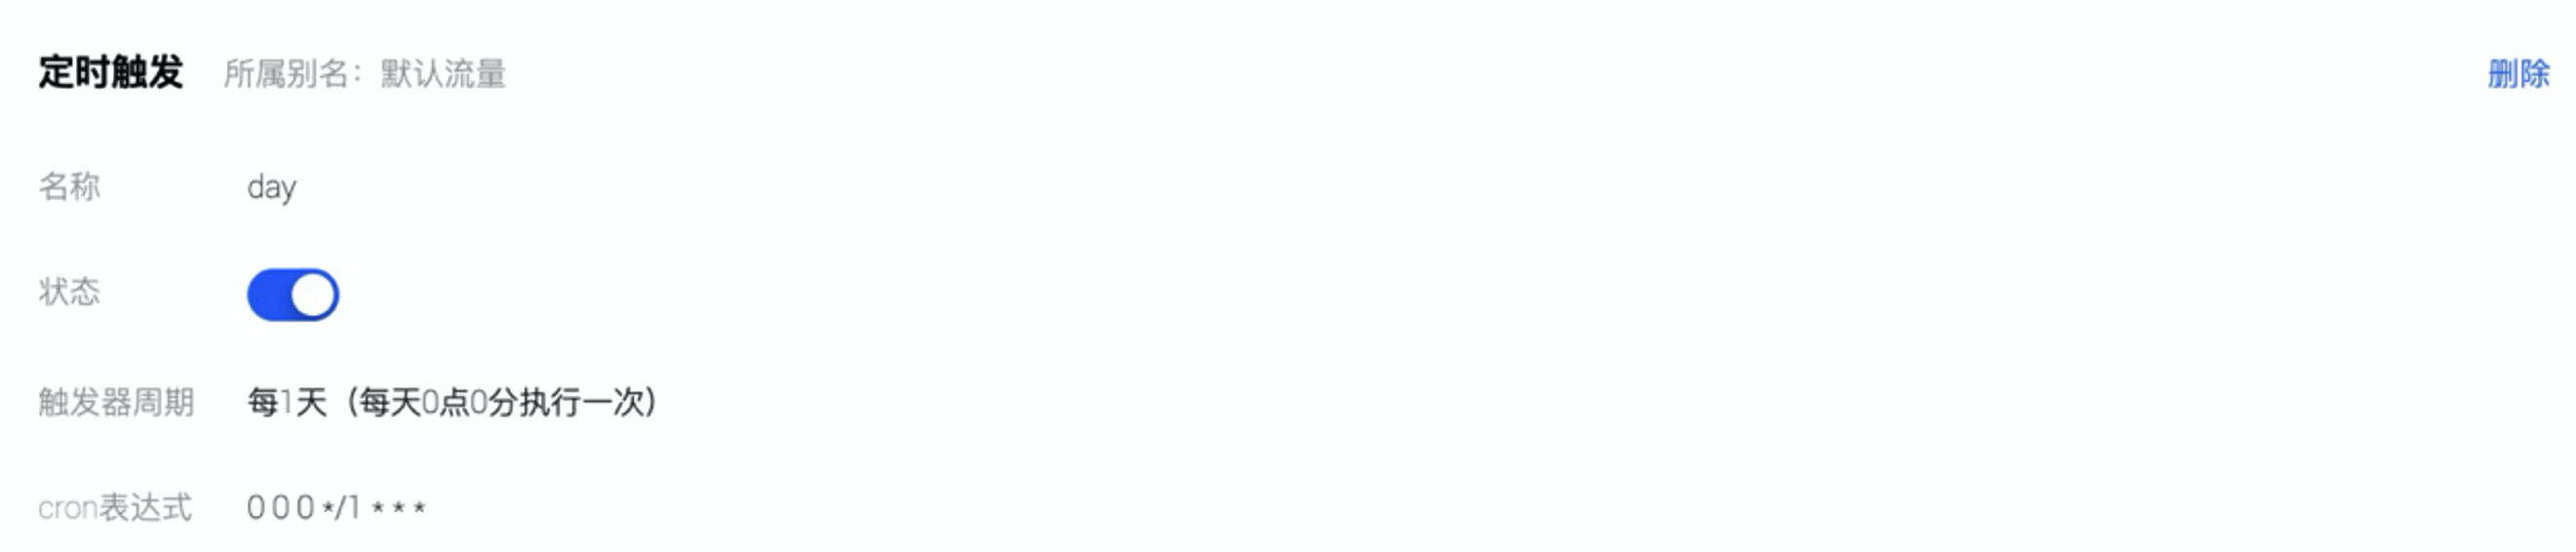
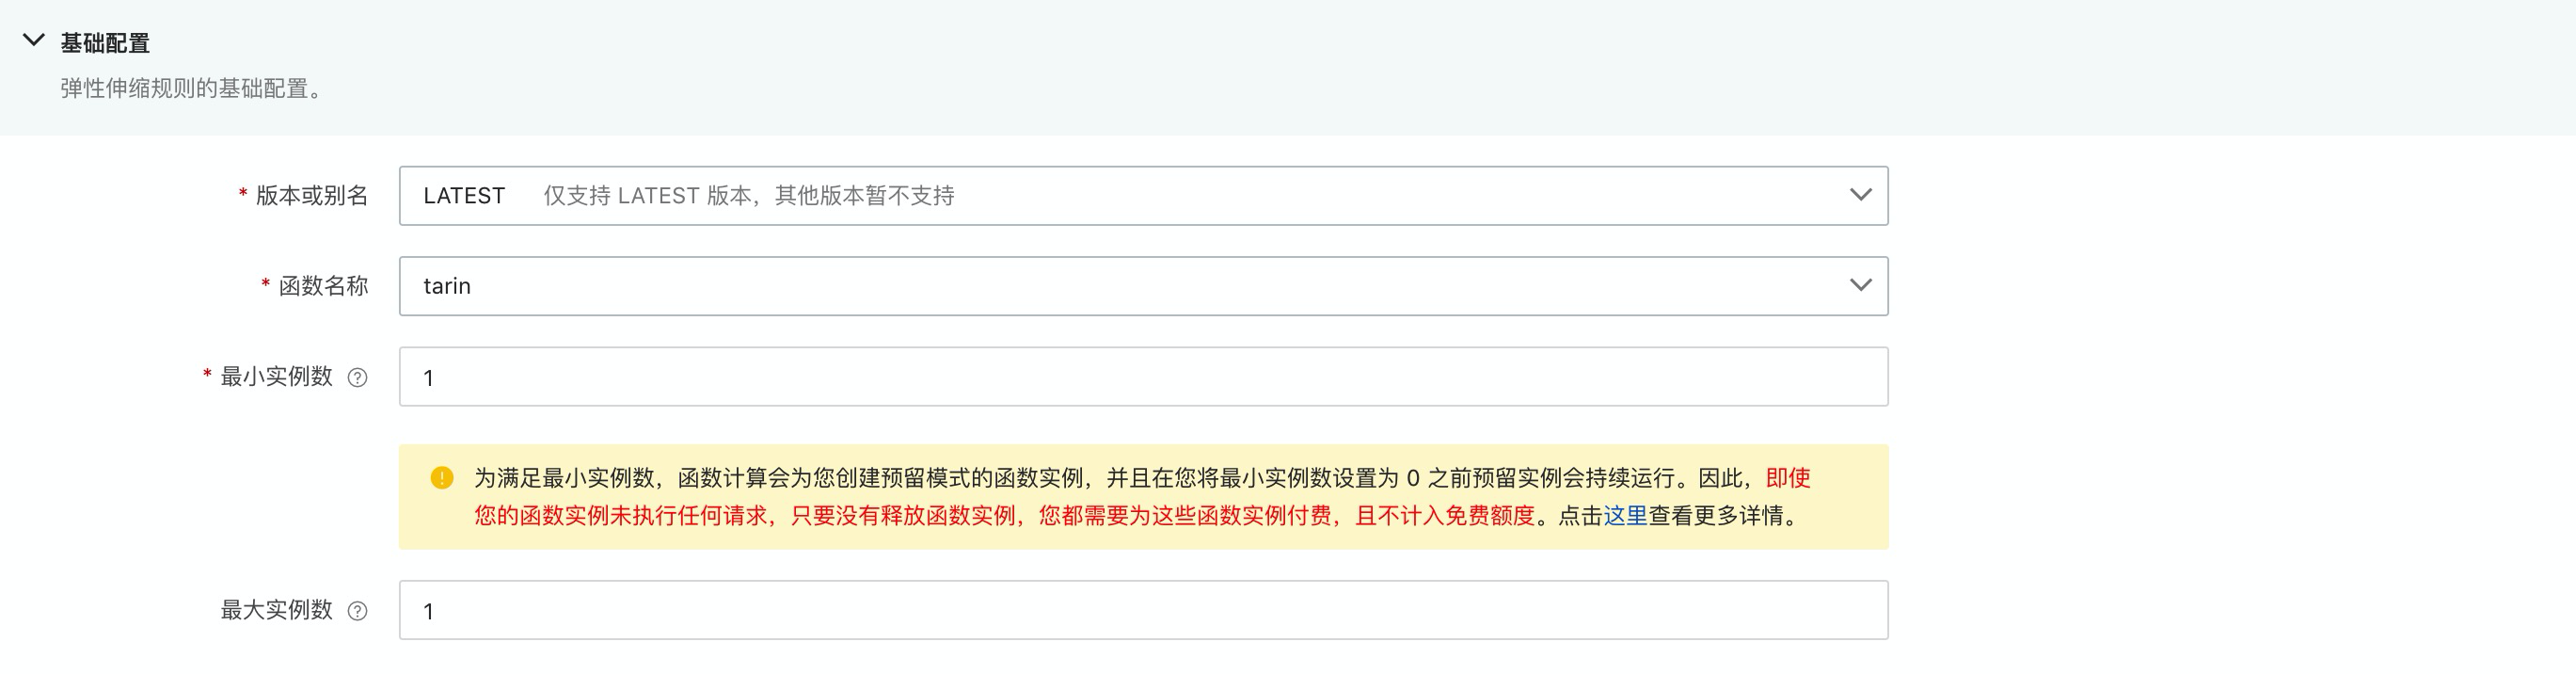
此时函数将会进行一定的逻辑处理,按照target分类将Base64的图片转为文件,并对应存储到对象存储中,此时,再由对象存储异步触发训练函数。为了保证训练的效率以及训练时的模型安全与稳定,此时可以针对训练函数进行最小/最大实例数的确定,以保证预留带来的启动性能提升,以及防止同时过多的训练任务出现:
在训练函数内部,将会根据每次触发结果判断已存在的猫狗数据是否分别达到某个阈值,为了确保模型更新迭代的公平性,此时可以设定当猫的标注数据与狗的标注数据同时达到某个数值,进行模型训练,进而更新迭代,同时最后将数据写入到NAS中,以确保新的预测函数可以读取到最新的模型进行模型的训练。
此时,可以通过Postman对用户反馈函数进行功能验证:
完成之后可以看到已经完成了预期的反馈,此时可以通过Python脚本,将之前准备的./strengthen目录下的内容进行批量提交:
1 | import requests |
批量反馈的脚本执行完成之后,可以通过日志服务查看模型训练的结果:
1 | ---------- 6 ---------- |
同时通过Serverless Devs开发者工具查看Nas中对应的model内容,可以看到:
1 | model_checkpoint_path: "model.ckpt-13000" |
即模型的准确度已经从之前的0.7542857提升到了0.8256281,同时NAS中的模型文件也完成了更新,即通过用户的反馈或者是新的标注数据,已经成功的实现了原始模型的更新升级。
5 项目优化
冷启动问题优化:通过测试可以看到,该项目在热启动时,完成一次预测请求热启动的响应时间大约是500毫秒,而冷启动涉及到镜像的拉拉取,进程的启动,初始资源的准备,整个时间大概在1分26秒左右

所以为了降低冷启动带来的影响,可以通过以下几个方面进行优化:
- 通过预留实例的功能;
- 精简构建的镜像体积;
- 开启镜像加速功能;
- 优化模型体积;
模型迭代触发逻辑优化:由于Serverless架构是天然分布式架构,具备天然的弹性能力,所以在对象存储触发训练函数进行训练之后,可能会由于并发极高,瞬间出现多个训练任务,最终同时将训练结果更新到Nas中,在一定程度下这个操作是具有一定风险的,所以模型迭代触发的逻辑可以从几个点考虑:
- 确保每次最多只有一个训练任务(可以通过设置实例上限实现该功能);
- 确保所有数据都可以正常存入到数据库,触发训练函数时,有训练函数自行决定本次触发是否需要进行训练;
模型的优化:由于本项目更多的是抛砖引玉,希望通过一个简单的案例可以帮助读者更简单的,快速的掌握通过函数计算进行预测,模型更新迭代的技巧,所以在模型定义时相对比较简单。在实际生产中,模型的定义会直接决定模型效果;
数据集优化:针对模型训练,数据集的质量和数量在一定程度上会直接决定魔性的最终效果,由于该实验采用的是Kaggle的开发数据集,一方面进行初始训练,另一方面又要进行测试,同时还需要进行模型的后期更新迭代,所以将原有的数据分成比较多的份数,在一定程度上会影响模型的训练效果以及最终的预测结果;
6 项目总结
本项目相对来说并不是一个非常复杂的项目。尽管采用的是Kaggle比较经典的猫狗识别项目,但是却在这个项目基础之上增加了用户反馈机制以及模型优化迭代机制。在实际生产过程中,类似的流程是非常常见的,毕竟一个模型被训练完成之后,通常情况下它是具有时效性的,即随着时间的发展,要在原来的模型纸上进行升级迭代,例如:
- 某推荐系统:将会随着被推荐的内容不断增加,系统要尽可能的推进最新的内容,必要时需要屏蔽老的内容;那么此时训练的内容和推荐的规则等都需要不断的升级迭代;
- 某分类系统:随着老的类别的剔除,新的类别的增加,需要进行模型的升级,以确保分类结果的准确性和精确度;
- 某目标检测系统:随着时间的发展,新的标注内容不断增加,为了保证目标识别的精准度,需要对模型进行不断的升级和迭代;
- ……
在传统架构下,该项目很可能要通过分布式架构,以及GPU服务器、CPU服务器等进行混合来进行项目的实现。并且开发者要关注极多的底层监控、资源等。而在Serverless架构下,仅需要通过对象存储、硬盘挂载以及三个函数,即可实现完整的所有功能,而开发者关注的更多是业务逻辑本身。
综上所述,该项目通过简单的案例,意在实现一个较为复杂和生产环境中常见的人工智能模型的更新迭代案例,通过该案例可以对以下技术点有进一步的了解:
- 如何通过Serverless架构实现人工智能模型的更新;
- 如何将容器镜像部署到Serverless架构上;
- Custom Container函数如何使用事件触发;
- 在AI的场景下,如何进行Serverless应用的冷启动优化,提升项目的性能;
欢迎您关注我的博客,也欢迎转载该博客,转载请注明本文地址: http://bluo.cn/cats-vs-dogs/ 。有关于Serverless等相关问题欢迎联系我:80902630
 |  |
| 微信号 | 抖音号 |